Company admins can take care of their housekeeping right in Zap. Use your agent dashboard and contact list to filter through your agents’ contacts, reassign contacts, or mark bogus and dead leads.
Use the admin dashboard
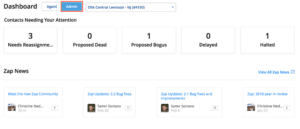
From the left navigation, select Dashboard. You can toggle between your agent and admin dashboard.
The admin dashboard gives a high-level overview of your contacts. Click into one of the buckets to automatically filter your contact list for each category.
Use management filters
You can also filter your contacts manually from Contacts in the left navigation panel. To apply management filters, click Filters, located next to the search bar and locate the section, Management Filters.
Assigned to filters for contacts assigned to a specific agent. Click the field labeled, Assigned To. Then type and select an agent name.
LR Admin Status filters contacts with a specific status: proposed bogus and bogus leads, proposed dead and dead leads, and leads that need reassignment. Read about the conversion between LR and Zap statuses here.
Assigned Status filters contacts based on whether or not they’ve been assigned to an agent.
Assigned(Active) displays all contacts who are presently assigned to an agent. It does not include contacts your agent has requested to remove.
Assigned(Inactive) displays the contacts your agent has requested to remove.
Unassigned displays contacts who are not presently assigned to an agent.
Click More Filters for Service Market, Lead Source, Branch (that an agent works out of), and Agent Type. We also include any standard filters available to your agent.
Reassign contacts and other admin actions
Once you’ve located a contact, click Actions from the far right of the contact name. To select multiple contacts at once, use the checkboxes and select Bulk Actions to perform a task.
You’ll have the option to 1) Reassign the contact to another agent or 2) Mark the contact as a dead or bogus lead.
Reassign contact
If there’s an agent who you think should work with a lead, choose Direct to Agent when prompted. You’ll be asked to type in and select an agent’s name. Include any comments for the receiving agent, if necessary. Under“Lead Rotation,” you’ll be given the option to have this lead count against the receiving agent and move them to the bottom of the list for additional leads(we leave this off by default). You’ll also need to choose whether you’d like the new agent to be notified by phone about the lead. Click the blue“Reassign” button when you’re ready.
Otherwise, you can select Auto-Route to have the lead automatically sent to the next agent in the rotation. Include any comments for the receiving agent, if necessary. Under“Lead Rotation,” you’ll be given the option to have this lead move the receiving agent to the bottom of the rotation for additional leads, but this is off by default. Click the blue“Reassign” button when you’re ready.
Mark a lead as bogus or dead
Once you click“Mark as Dead or Bogus,” you’ll be able to select“Dead Lead” or“Bogus Lead.” Select“Dead Lead” if your agent isn’t able to convert the lead(for example, they’re not in the market or don’t want to be contacted.” Select“Bogus Lead” if they’re not a true lead(for example, they provided a fake name and phone number). You can also add comments to store in the Contact’s record.