Whether you’re an agent or running a company, you can create custom pages on your Zap website that reflect you and your business.
Creating custom pages for your agent website
- Click on your name or photo in the upper right corner of Zap, and then click My Website from the menu.
- Scroll to the Content section—you should see a few tabs, including About Me, Buy a Home, Sell a Home, and Custom Pages. Click on Custom Pages.
- Click the button labeled New Custom Page to get started.
- Give your page a title. This main title will appear at the top of the page.
- Add your page content to the main text editor. Use the toolbar for to style or preview your content:
- Add text styles (Bold, Italics, Underline)
- Format text (Bulleted Lists)
- Include images
- Include links
- Preview page
- Click Add A Cover Photo. Upload a file that is at least 1280 by 384 pixels, and use the slider to crop the image as you like.
- When you’re all done adding content, go to the Save As button in the top right corner of the screen.
- Enter a Navigation Title—this is the title that will appear should you choose to show the page in your website’s navigation bar.
- Choose a category—these categories are determined by your brand, and will be used to group your custom pages in your navigation if you add more than 5 custom pages.
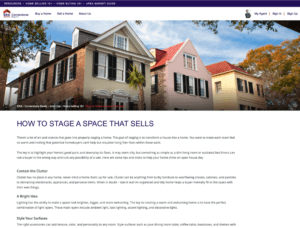
- Last, choose whether you want this page to be displayed in your website’s main navigation. See below for an image of where the page appears in your navigation.
- If you’re ready to publish your page to the public, click Publish. If you need more time, click Save Draft.
Creating custom pages for your company website
- Click on Manage in the left navigation panel and then select Configurations
- Scroll to the Content section—you should see a few tabs, including About Me, Buy a Home, Sell a Home, and Custom Pages. Click on Custom Pages.
- Click the button labeled New Custom Page to get started.
- Give your page a title. This main title will appear at the top of the page.
- Add your page content to the main text editor. Use the toolbar for to style or preview your content:
- Add text styles (Bold, Italics, Underline)
- Format text (Bulleted Lists)
- Include images
- Include links
- Preview page
- Click Add a Cover Photo. Upload a file that is at least 1280 by 384 pixels, and use the slider to crop the image as you like.
- When you’re all done adding content, go to the Save As button in the top right corner of the screen.
- Enter a Navigation Title—this is the title that will appear should you choose to show the page in your website’s navigation bar.
- Choose a category—these categories are determined by your brand, and will be used to group your custom pages in your navigation if you add more than 5 custom pages.
- Last, choose whether you want this page to be displayed in your website’s main navigation. See below for an image of where the page appears in your navigation.
- If you’re ready to publish your page to the public, click Publish. If you need more time, click Save Draft.
What your clients see
Your custom page will appear in the very top bar of your site’s navigation should you choose to include it. If not, you’ll need to use direct links to custom pages.