To add Contacts to your Zap Contact Pool, follow these steps:
Add contact on desktop
1. There are two ways to add a new contact on desktop.
- Click on + Add in the top navigation panel and select New Contact > Individual Contact.
- From the Contacts page, locate the dropdown New Contact and select Single Contact.
2. This will bring you to a page where you can fill in your contact’s information. You are required to provide only a phone number OR email address.
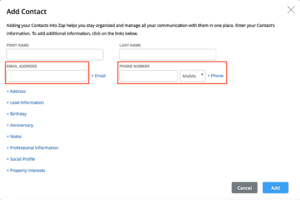
3. Enter any other optional fields for your contact.
- Address
- Lead Information
- Birthday
- Anniversary
- Notes
- Professional Information
- Social Profile
- Property Interests
4. Click Continue once you’ve filled in all your information.
5. If you have toggled on the Auto-Lead Welcome Email function, Zap will automatically send an email to your newly entered Contact to let them know that you’ve created a website account for them.
6. You can add a personalized note by clicking into the field provided. Once finished, click Send Email.
Add contact on mobile
1. Access Contacts from the bottom navigation.
2. Tap the plus icon in the bottom right corner and select New Contact.
3. Enter the required fields for your contact.
4. Enter the optional fields for your contact.
5. Tap Save on the top right corner.